Instructions for Using Swish-Hoop® Products
WATCH THIS VIDEO FOR SKILLS TRAINER SETUP INSTRUCTIONS

WATCH THIS VIDEO FOR TWISTER FIRST TIME ASSEMBLY INSTRUCTIONS
You can also tap on the product below for more detail
Swish-Hoop® Shot Monitor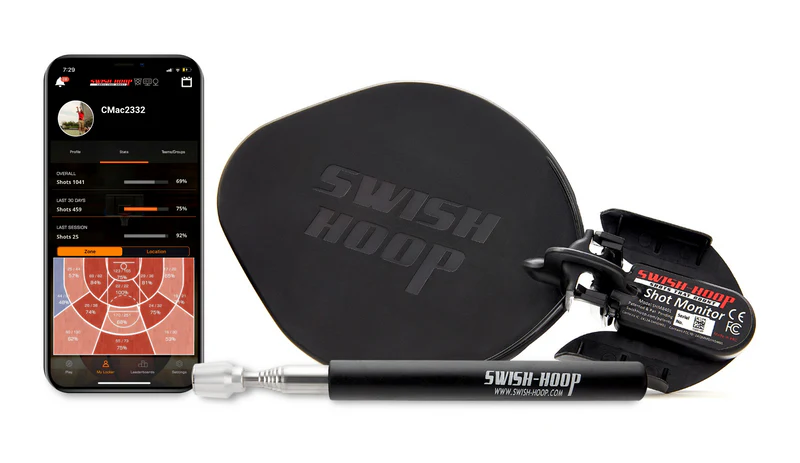
|
Swish-Hoop® Personal Scoreboard
|
Swish-Hoop® Twister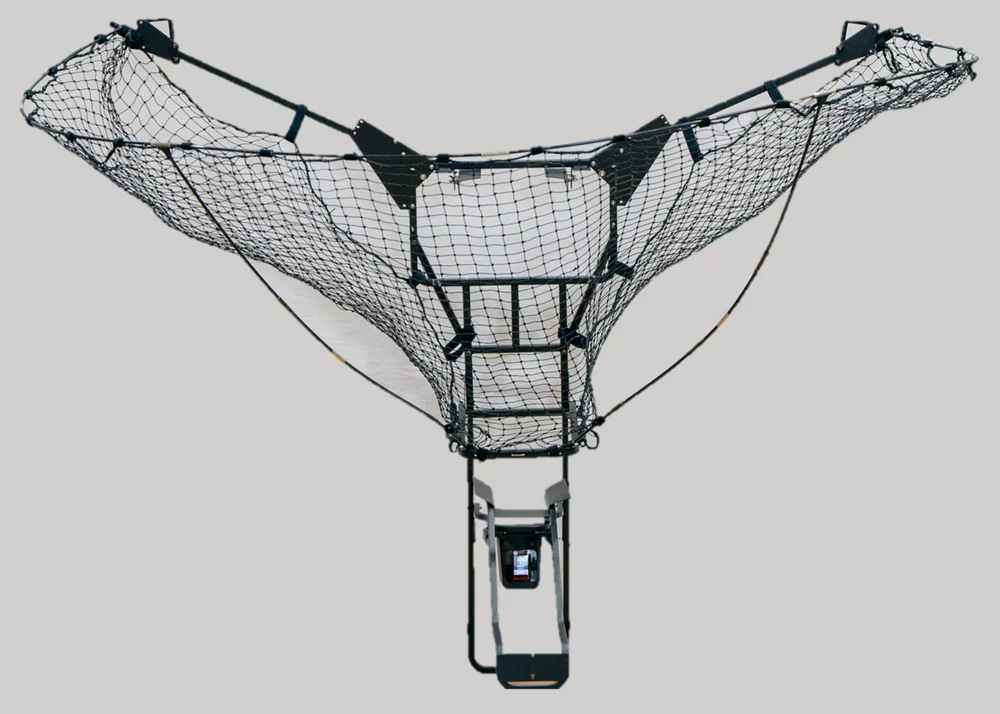
|
Swish-Hoop® Shot Monitor
Unboxing and Activation
Congratulations on purchasing the Swish-Hoop® Shot Monitor. The package should include:
- Swish-Hoop® Shot Monitor paddle
- Swish-STIC telescoping installation tool
- Instruction card
The Swish-Hoop® Shot Monitor is a basketball shot sensor that hangs on a basketball net. It is fully sealed and never requires recharging. It may be used indoors or outdoors and may be kept on the basketball net between shooting practices, or taken down after each one. It should not be left outdoors in freezing temperatures.
The Swish-Hoop® Shot Monitor tracks shots by connecting to a free Swish-Hoop® Player App on an iOS (iPhone or iPad) or Android mobile device (smartphone or tablet) supplied by the customer. The device needs to have Bluetooth 4.0 or higher in order to communicate with the Shot Monitor. See here for some example devices.
After unpacking the Shot Monitor, perform the following steps to use the system.
Step 1. Load the free Player App onto your Smartphone or Tablet
The Shot Monitor comes with a free Swish-Hoop® Player App ![]() for either your iPhone, iPad or Android phone or tablet.
for either your iPhone, iPad or Android phone or tablet.
For an iPhone or iPad, tap here or tap App Store icon ![]() on your device and search for
on your device and search for ![]()
For an Android device, tap here or tap Play Store icon ![]() on your device and search for
on your device and search for ![]()
Step 2. Unlock the Shot Monitor Paddle
The Swish-Hoop® Shot Monitor paddle will either have a battery pull tab or be electronically locked when it is first removed from its box. It only needs to be unlocked once, then it can be more simply activated with a single tilt. Any unlocked Shot Monitor will display a double blink, showing it is ready to connect to a mobile device.
If a battery pull tab is present (a thin plastic circle extending from the back that says "PULL"), then firmly grasp it and pull it from the back of the Shot Monitor, which should initiate a double blink.
If no pull tab is present and the device is not showing a double blink, use the following procedure to unlock the Swish-Hoop® Shot Monitor Paddle (click/tap here for a video demonstration). Each time the green light underneath the paddle blinks, tilt it in the other direction:


NOTE: After this initial unlocking, Shot Monitor may be activated while on the net by sinking a basket with a ball.
Step 3. Pair the Sensor in the Paddle to the Mobile Device
If the app is not yet open, start the Swish-Hoop® Player App on the phone or tablet by tapping the icon ![]()
If you are not yet a registered user, follow instructions on the app to register, or if you prefer, you can register online here.
NOTE: If you are under the age of 13, you will need to follow the directions during registration to get your parent’s permission to use the app.
First make sure the Bluetooth feature on the device is turned on. You may have to exit the app and go to the device’s settings screen.
Use the following steps to connect the mobile device to the Swish-Hoop™ Shot Monitor:


If you are using a Swish-Hoop® Personal Scoreboard with the Shot Monitor, see step 5 below to also connect the Scoreboard to the Player App.
Step 4. Plug in the Swish-STIC
The telescoping Swish-STIC (Shot-Monitor Telescoping Installer/Cincher) extends to about 33 inches (84 cm) to allow users to attach the Swish-Hoop® Shot Monitor paddle to a net without lowering the net or using a ladder.
The Swish-STIC also actuates the patent pending net latching system on the Shot Monitor. This allows the Shot Monitor to be securely attached during play, yet easy to remove when play has completed.
Use the following procedure to attach the Swish-STIC to the Shot Monitor:
- Push the end of the Swish-STIC against the metal disk at the bottom of the Shot Monitor
- Make sure the magnet is fully seated on the metal disk and the latch is fully opened
- Gently extend the Swish-STIC to its full length prior to inserting the Shot Monitor through the net from the outside.

WATCH THIS VIDEO FOR SHOT MONITOR ATTACHMENT INSTRUCTIONS
Step 5. Hang the Shot Monitor on the Net
Insert the Shot Monitor paddle from the outside of the net through one of the large net loops just below a rim hook. See the video here.
Make sure the two net strings are seated in the rounded slots. A small back and forth motion can help to seat them.
The knot below the two strings should be centered between the latch fingers. Pull down the Swish-STIC so it detaches. Assure the latch fully closes and does not catch on the net strings.


Step 6. Select a Drill and Start Shooting
In the Swish-Hoop® Player App on the mobile device, tap the Play icon ![]() and select a drill. Tap the Search icon
and select a drill. Tap the Search icon ![]() to search for a specific drill name.
to search for a specific drill name.


Tap the drill to see the drill details. In this screen you can see a video demo, select additional shooters, how you want to alternate between players, from where on the court to shoot, etc.
To start the drill, hit ![]() and start shooting.
and start shooting.
Reactivation
After the Swish-Hoop® Shot Monitor has been unlocked and paired with the mobile device the first time, subsequent connections may be quicker.
Re-Pair the Sensor in the Paddle to the Mobile Device
Open the Swish-Hoop® Player App on the mobile device and go to the Play screen by tapping the Play icon ![]() at the bottom of the screen.
at the bottom of the screen.
Make sure the Bluetooth feature on the device is turned on.
On the Play screen, tap any of the connection icons at the top right of the screen to activate the wireless connections.

Tilt the Shot Monitor Paddle down to activate it and wait for the net icon to turn white. This may take up to about 30 seconds.
The Shot Monitor is now connected and you may continue to steps 4, 5 and 6 above to start shooting.
WATCH THIS VIDEO FOR SHOT MONITOR REMOVAL INSTRUCTIONS
Swish-Hoop® Personal Scoreboard
Unboxing and Activation
Congratulations on purchasing the Swish-Hoop® Personal Scoreboard. The package should include:
- Swish-Hoop® Personal Scoreboard
- Charging cord
- Charging wall plug
- Instruction card
The Optional Tripod Kit Also Includes
- Tripod stand and plastic nut
- Stand drawstring bag
- Tripod mounting bracket
- Phone bracket
- Phone holder and securing knob
The Swish-Hoop® Personal Scoreboard is a high-visibility, full color LED scoreboard for courtside monitoring of shooting stats in real time. It displays stats by connecting to a free Swish-Hoop® Player App on an iOS (iPhone or iPad) or Android mobile device (smartphone or tablet) supplied by the customer. The device needs to have Bluetooth 4.0 or higher in order to communicate with the Personal Scoreboard.
The system is fully sealed, uses an internal, rechargeable Lithium Ion battery (not user accessible) and requires recharging after about 8 hours of use. Time between charges may vary and will likely decrease if used in bright lighting. The Personal Scoreboard is approved for indoor or outdoor use and will not operate when the charging cord is installed.
Charging the Battery
Before using the Swish-Hoop® Personal Scoreboard for the first time, the internal battery should be charged. Plug the charging wall plug into a wall socket and connect the charging cord to both the wall plug and the connector on the side of the Scoreboard. The Scoreboard will not operate when the charging cord is connected. While charging, an LED charge indicator at the top of the front side of the Scoreboard will show red. When the battery is fully charged, it will show green. The system may take 6 to 8 hours to fully charge. When the unit is disconnected from external power, the LED charge indicator will turn off.
System Start Up
After unpacking the Personal Scoreboard, perform the following steps to use the system.
Step 1. Load the free Player App onto your Smartphone or Tablet
The Personal Scoreboard uses the same free Swish-Hoop® Player App ![]() as the Shot Monitor. If you have not already done so, install the Player App to your iPhone, iPad or Android phone or tablet as described in Step 1 above.
as the Shot Monitor. If you have not already done so, install the Player App to your iPhone, iPad or Android phone or tablet as described in Step 1 above.
Step 2. Activate the Personal Scoreboard
The Swish-Hoop® Personal Scoreboard needs to be activated after being unboxed for the first time. To activate the Personal Scoreboard for the first time, simply push the reset button on the side.
Step 3. Assemble the Personal Scoreboard to the Tripod
WATCH THIS VIDEO FOR SCOREBOARD SETUP INSTRUCTIONS
The Swish-Hoop® Personal Scoreboard may be used while sitting on a table top, on the court floor, mounted on the enclosed tripod or while hanging from the backboard or other structure (requires the additional hanging kit).
To use the Personal Scoreboard on its tripod stand, follow these steps:


Step 4. Assemble the Phone Holder
A holder that positions a cell phone on top of the Personal Scoreboard may be optionally attached to the mounting bracket using the supplied knob. To attach the phone, pull apart the two jaws of the holder and place the phone between them. Gently release the jaws to clamp the phone. There are three configurations for the holder on the bracket: forward horizontal, forward vertical and angled horizontal. Select the appropriate hole on both the bracket and the phone holder for the various orientations. The horizontal orientation options are recommended for video recording.


Step 5. Pair the Personal Scoreboard to the Mobile Device
If the app is not yet open, start the Swish-Hoop® Player App on the phone or tablet by tapping the icon ![]()
If you are not yet a registered user, follow instructions on the app to register, or if you prefer, you can register online here.
NOTE: If you are under the age of 13, you will need to follow the directions during registration to get your parent’s permission to use the app.
First make sure the Bluetooth feature on the device is turned on. You may have to exit the app and go to the device’s settings screen.
Use the following steps to connect the mobile device to the Swish-Hoop® Personal Scoreboard.


To display shooting stats courtside, a Swish-Hoop® Shot Monitor must also be connected to the mobile phone along with the Personal Scoreboard, see step 3 above to also connect the Shot Monitor to the Player App. Both connections may be established at the same time.
Step 6. Select a Drill and Start Shooting
Follow steps 4, 5 and 6 above to start shooting.
Reactivation
After the Swish-Hoop® Personal Scoreboard has been activated and paired with the mobile device the first time, subsequent connections may be quicker.
Re-Pair the Scoreboard to the Mobile Device
Open the Swish-Hoop® Player App on the mobile device and go to the Play screen by tapping the Play icon ![]() at the bottom of the screen.
at the bottom of the screen.
Make sure the Bluetooth feature on the device is turned on.
On the Play screen, tap any of the connection icons at the top right of the screen to activate the wireless connections.


Press the reset button on the side of the Scoreboard to activate it and wait for the scoreboard icon to turn white. This may take up to about 30 seconds. Make sure the net icon is also white. If not, tilt the Shot Monitor to activate it. When both the net and scoreboard icons turn white, the system is fully connected and you may continue to steps 4, 5 and 6 above to start shooting.
Recording Videos of Your Shooting Sessions
WATCH THIS VIDEO FOR IN-APP VIDEO RECORDING INSTRUCTIONS
Swish-Hoop® Twister™
Twister™ User Manual
Download the Twister™ User Manual HERE
The User Manual covers the following topics:
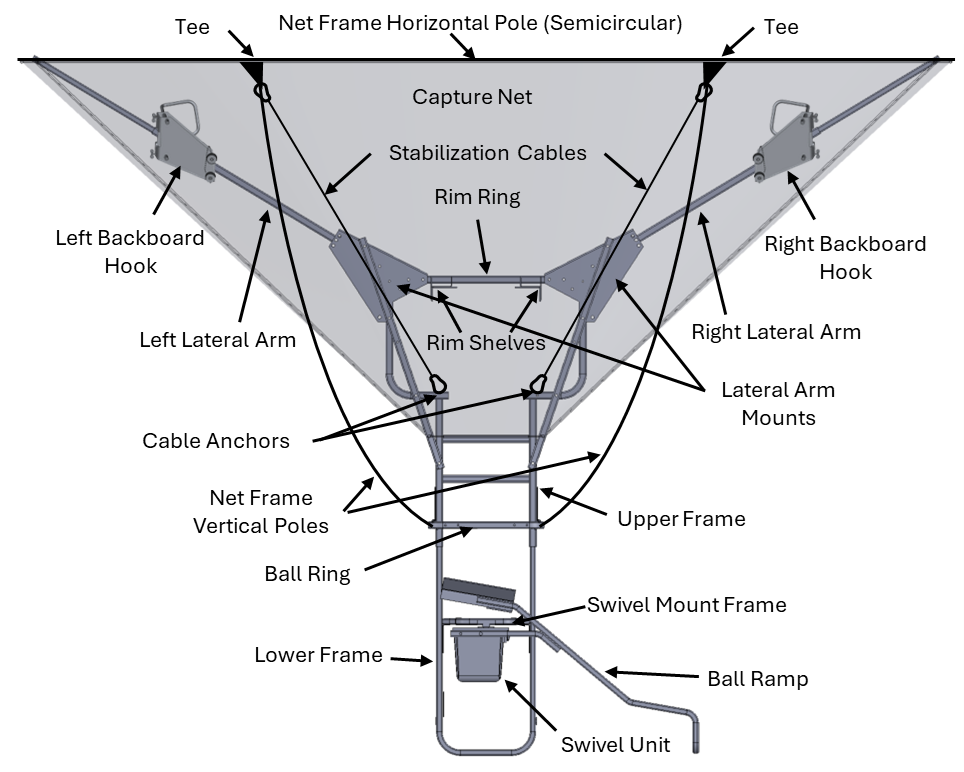
- Component Terminology
- What’s in the Box?
- System Requirements and Compatibility
- Quick Start Guide
- Overview of the Twister™ Product
- Twister™ Interfaces
- Operating Instruction
- System Maintenance and Trouble Shooting
- Support and Warranty Information
Unboxing and First Time Assembly/Set Up of the Twister™
Download the Twister™ First Time Assembly Instructions HERE
You may also want to watch the animated first time assembly instructions HERE
Folding the Twister™ for Transport and Storage
Download the Twister™ Folding Instructions HERE
You may also watch THIS VIDEO for a demonstration of removing the system from the backboard and folding it for transport and storage
Unfolding and Attachment to Backboard/Rim
Download the Twister™ Unfolding Instructions HERE
You may also watch THIS VIDEO for a demonstration of unfolding and attachment to the backboard
Capture Net Height Change Instructions
Adjusting the height of the Capture Net is described in the Twister™ Unfolding Instructions (above)
Personal Scoreboard Twister Attachment Instructions
The attachment of the Swish Hoop Personal Scoreboard, which comes with the PRO systems, to the Twister™ is described in the Twister™ User Manual (above)
Twister™ Components
⚠ -- CAUTIONS -- ⚠
Contains FCC ID: 2AQMMSHNSM01, 2ABU6-MS88SF2
Contains IC: 24124-SHNSM01, 20896-MS88SF2CAUTION! To satisfy FCC RF exposure requirements for mobile transmitting devices, a separation distance of 25 cm or more should be maintained between the antenna of this device and persons during device operation. To ensure compliance, operations at closer than this distance are not recommended. The antenna used for this transmitter must not be co-located in conjunction with any other antenna or transmitter.
This device complies with Industry Canada’s license-exempt RSSs and part 15 of the FCC Rules. Operation is subject to the following two conditions: (1) This device may not cause harmful interference, and (2) this device must accept any interference received, including interference that may cause undesired operation.Change or modifications that are not expressly approved by the manufacturer could void the user’s authority to operate the equipment. Cet appareil est conforme aux normes d’exemption de licence RSS d’Industrie Canada. Son utilisation est soumise aux deux conditions suivantes: 1. Cet appareil ne doit pas provoquer d’interférences, et 2. Cet appareil doit supporter toute interférence,y compris celles pouvant provoquer un fonctionnement non souhaité de l’appareil.
⚠︎ WARNING – THE TWISTER SYSTEM ADDS WEIGHT TO THE BACKBOARD, WHICH MAY REQUIRE ADDITONAL COUNTERBALANCE WEIGHTS TO BE ADDED TO A MOBILE BASKETBALL GOAL, SO THAT IT DOES NOT FALL FORWARD DURING USE
⚠︎ WARNING – THE TWISTER IS AN AUTOMATED MACHINE WHICH MAY MOVE AT ANY TIME. STAY CLEAR OF THE RAMP AND OTHER MECHANISMS TO AVOID INJURY.
⚠︎ WARNING – THE TWISTER WILL NOT SUPPORT THE WEIGHT OF A PERSON AND MAY RESULT IN INJURY IF A PERSON OF ANY SIZE PULLS OR HANGS ON THE SYSTEM.
⚠︎ WARNING – TO AVOID INJURY, READ AND UNDERSTAND THE TWISTER™ USER MANUAL BEFORE OERATING THE SYSTEM.